Landscape photography typically involves wide-angle lenses and many landscape photos have been taken on camera that rests on a tripod, to maximize the overall quality of the photo, as well as to help with the composition. However, even wide-angle lenses have their limitations. You can only go so wide, which is particularly the problem in tight quarters.
Combining photos
It is possible to overcome the limitations of having to fit in everything in one photo by simply taking more photos and then combining them. This is typically done on a computer, following the photography, but it is possible to this in cameras that have a panorama feature (digital cameras are, in fact, computers). In essence, multiple photos are merged to form a larger photo. This computational approach is generally known as image or photo stitching.
To keep this practical, I will not get into the specifics of how it all works. To be honest, I am not an expert in how this is done, how the algorithms work, and therefore I would not be even able to explain it to you. What I want to achieve in this post is to explain how it all works, in practice, and to elaborate its advantages and disadvantages.
Overlap and consistency
There are number of things that need to be taken into consideration before you attempt to compose one photo from a number of photos. These things need to be taken into consideration at the very beginning as otherwise you will have to do it all over again.
The important thing about stitching is that requires photos that overlap with one another considerably. In other words, you need plenty of redundant information for a computer to process. This should be easy to comprehend by imagining yourself combining multiple very similar images by hand. If there is very little overlap, it is difficult to stitch them together into a coherent whole. If there is plenty of overlap, this is much easier.
Another important thing is to use fixed settings. Using the sweet spot of your lens, which means that it is important to know your camera and lenses, and the lowest sensitivity setting is advisable, considering that this is about maximizing the quality, making it easy as possible for the computer to do the stitching. The shutter is not as important in daylight conditions. Low shutter speeds may result in fuzzy people in the photo, which may or may not be to your liking, depending on your preference.
In addition, it is highly important to fix the focus. You can initially use the autofocus, before the first photo, but then it needs to be set on manual focus. The purpose is to avoid changes in the depth of field between the photos. The idea is to keep it all the same.
If you have rapidly changing lighting conditions, e.g., a partially overcast sky, you may run into some difficulties later on. You may consider adjusting the photos in post processing, to match one another as closely as possible, if that happens. In my experience, it does not matter that much. The stitching software seem to be capable of handling it. I would, nonetheless, try to avoid major differences in the exposure, which is possible if you use manual settings and wait for the ambient lighting to remain consistent long enough for you to avoid any potential hassles down the road.
Staying parallel or rotating
You also need to consider whether you will be attempting to stitch a linear panorama or a rotational panorama. In the former, the distance between the camera and the subject remains the same. In practice, this means that the camera only travels sideways.
Staying parallel
Imagine that you are photographing a wall covered in graffiti, but you simply cannot fit it all in. You could cover it from an angle, but that is hardly an ideal solution if you want to analyze it all later on. There is a better solution.
Position yourself at the edge of the wall. Then step away from it, backing, fitting the wall in the viewfinder (or the screen on the back of the camera) vertically. It is time for the first photo, followed by stepping to the side, let’s say to the right, and then it is time for another photo. You repeat this procedure until you reach the other end of the wall. Once you are done, the computer will do the rest.
The idea behind this is that, assuming the distance between the camera and what you are photographing, remains the same, as it does with a wall (assuming it does not, for example, curve). You could then simply merge the photos, one by one, in post-processing. It would be easy to stitch it together, to render a composite photo out of the photos, because there would be considerable overlap and as the geometry remains the same.
In an ideal setting, this would be as simple as measuring the distance between the camera and the wall, from one end, and then from the other end, followed by marking these spots and drawing a line between them. You would then remain at the same distance as the camera moves sideways.
Height may prove to be a problem, especially in tight quarters. There is, however, a solution to this. In this imagined example, if the wall would not fit in the frame vertically, you would simply take multiple photos at different elevations, while the distance remains the same. The photos are then arranged in relation to one another, so that they overlap both vertically and horizontally.
Measuring the distance and drawing a line on the ground or setting up a string, a thin rope, or a wire between two poles would do the trick. Then you would move place the camera on a tripod, with its center moving along that that line, in order to maintain the distance from the wall.
In practice, pulling this off is much more difficult than it seems. Simply maintaining the distance is quite difficult. There are not that many places that are designed this in mind and the ground is hardly ever even. In addition, you might be in people’s way.
If you want to make sure that everything is accurate as possible, set up a rail and then move the camera on it horizontally. To take tight quarters into account, you can change the elevation of the rail. It is, however, unlike that you will be working with rails. Firstly, rails are expensive. Secondly, the setting one up is impractical.
I have tried this approach, in very tight quarters and made it work. I could not maintain the exact distance as I would have been too close to what I was photographing, a plywood wall, and blocked people’s path. I was able to stay as far as possible, while maintaining more or less the same distance from the wall and then make it work on a computer. Therefore, I can vouch for this. It is all about consistency and it does work, as long as you know what you are doing.
To be honest, I have only had relative success with this. I have only been able to combine a handful of images. Beyond that it simply does not look good. In my experience, it is simply so difficult to find even ground outdoors that the more photos you combine, the more errors you are going to run into.
To stay positive, I would say that being able to combine a couple of photos is, in itself, a win, because the more photos you combine in this way, the more impractical it becomes to view the composite photo. It becomes so wide that it is not possible to view it on a screen in a way that makes much sense, no matter oh wide your screen is. Furthermore, the file size ends up being impractically large. I actually ran into an issue where, had it all worked out, the composite photo would have had so many pixels that it would no longer have been possible to save it in a file format that can be viewed without specialized software.
I am aware that there are certain ways of overcoming such obstacles, by, for example, saving the composite photo in a way that deconstructs it and then reconstructs it, piece by piece, as you are viewing it. That is how some map software works with the satellite imagery. That is not, however, very practical in research as the purpose is to showcase what one is dealing with and then to analyze it.
Rotating around an axis
Imagine that you are photographing a square, from one of its corners or its sides. You seek to cover up to 180 degrees. At the center of the square, you may seek a full 360-degree coverage. In this case the key thing is not to move the camera, only to rotate it. You can do this even without a tripod, on a monopod or even handheld, assuming that the lighting conditions are adequate and you know what you are doing, but I recommend doing this on a tripod. The process is then easier to control. Again, it is all about consistency.
I would argue that this kind of rotational panorama is easier to pull off than a linear panorama, inasmuch as you have a tripod and know how to use it. You will not be moving the tripod, except between panoramas, which means that it is unlikely that you will run into any issues. You do, of course, have to set up the tripod and level it first. If you do not know how to do that, it is as simple and, at times, as frustrating as adjusting the tripod legs. Other solutions include using a level base in between the tripod and the tripod head, a half ball tripod head and a tripod that has a bowl to accommodate for that design, or a self-leveling tripod.
You can check the results with a bubble level. Many tripods have them built in, but you can also buy them separately. Your camera may also have built in level indicators. If you want to be sure, check the results yourself. If the horizon changes, you should adjust things accordingly. Also, make sure that your camera lens is not facing down, nor facing up. This simply means that your tripod head and/or the plate that it rests on should be leveled both horizontally and vertically.
Centering
To be clear, you do have to make sure you that everything is centered. You need to inspect your camera and your tripod. I will work you through in that order.
The first thing to check is whether your camera can be mounted on a tripod. Most cameras have a tripod socket at the bottom of the camera. It is typically located below the camera sensor, to make adjusting things on a tripod more convenient, but it might also be positioned elsewhere. Smaller cameras or camera bodies have less real estate, so it makes sense for the design team to have it placed elsewhere or to simply not include it. If it is not located at the bottom of the camera, below the sensor, you need to make horizontal adjustments, which is an extra hassle. If there is no socket, you may need another solution. For example, smart phones have clamp holders. I would not, however, recommend a smart phone, because the lens placement forces you to make extra adjustments. The second thing to check is the tripod socket standard.
The third thing to check is whether tripod head has an adjustable plate (commonly known as a quick release plate), so that you can move the camera move back and forth on top of the tripod. That allows you to fine tune the placement of the camera on top of the tripod. If your camera body is going to be horizontal, a simple ball head may work just fine for you. I do, however, recommend a tripod head that comes with an adjustable plate.
The fourth thing is to check the tripod head screw thread. It should be the same as the one in your camera. The most common thread is the 1/4″, but larger cameras use a sturdier 3/8″. Some tripod heads account for both, so that as you as attach the camera to the tripod head, it slips down to account for the smaller threads, but that is pretty rare. You will most likely be using a camera that has a 1/4″ socket and a tripod with 1/4″ screw, so this is unlikely going to be an issue. There also adapters and some plates account for both sizes in their design, so this is unlikely going to be an issue.
The fifth thing to keep in mind is to gently attach the plate or ball head with the screw to the socket, as your camera manual most likely will remind you. Some cameras have plastic sockets or base plates that accommodate the socket, so while it is unlikely that anything will ever go wrong, it is possible that something will go wrong if you use too much force. Your fingers should do the trick. You do not need to use the whole wrist to fit in a small screw into a socket.
To be clear, the center is the lens entrance pupil, not the center of camera body. If you intend to keep the camera body horizontally and the tripod socket is where you expect it to be, below the sensor, no horizontal adjustments are needed. You only need to adjust the camera a bit back on the tripod head. If the lens you use is short wide-angle lens, it may well be that you do not even need to do this adjustment. In my experience even older software can handle such a minor discrepancy.
I use the SMC Pentax-DA 15mm F4 ED AL Limited, which is a super wide-angle prime lens, designed for APS-C sensors, and have basically no issues it, whatsoever. It is, however, a noticeably slim design, protruding just a hair shy of four centimeters from the lens mount. The camera tripod mount is another four centimeters back from the lens mount, so my guess is that the lens entrance pupil is one to two centimeters from the mount. Even without any adjustment, it is close enough for the software to have little to no issues with it.
If you are using a bigger lens, you may run into issues and then you need to do some adjustments. That should not be a problem though. All you need is the right equipment and some patience. This is, however, a good reminder to everyone that bigger is not always better in photography. Smaller is at times better, in the sense that it is often more convenient.
What you then need to do is to simply adjust the camera on the tripod, moving it back a bit. You should be able to move the camera on the quick release plate and/or on the tripod head that the plate attaches to. That probably gets where you want to be. It may take a bit of fiddling with it, but it is not that difficult. It is now all about patience.
If you are not getting good results, it means that you need to make sure that the lens entrance pupil is aligned correctly with the tripod. The easiest way to check this is to have the camera on the tripod and use the back screen of your camera to check if subjects in the field of view appear closer or further away as you rotate the camera on the tripod. If things keep changing in the live view mode, then further adjustments are needed.
If you want to avoid having to keep fiddling with it, get a tripod head and plates designed for fine tuning. You can then see how many millimeters you have adjusted things, and on what axis, is going to be a major time saver. Once everything is in order, you can make notes of the distances on that setup and rely on those later on. For that you do, however, need a sturdy tripod head that allows fine tuning, back and forth on one plate, sideways on another plate. If you are opting to position the camera body vertically, then you also need a so-called L bracket. It is basically an L shaped quick release plate which allows you to switch back and forth between horizontal and vertical set ups.
Your camera and lens do not have to be the top of the line, as I noted in my posts on budgeting. The same applies to the tripod. A cheap tripod with a slightly adjustable quick release plate might be just enough for your purposes. To be honest, I have winged it horizontally, on a monopod, and even handheld, rotating the camera in between my fingers, nesting the pentaprism at the top and the bottom between them, and the results are nothing short of spectacular. Not knowing that, you would not know how hacky it was.
This is not to say that a sturdy tripod, a solid tripod head and a set of plates and brackets are not useful. They are. It is as simple as that. They do, however, come at a price. If you want something nice, like all by Manfrotto, it is not going to be cheap. Their bundle that contains the head and the plates costs approximate 500 to 600 euro. You also need the tripod itself for that, so, in total, you will be spending closer to a 1000 euro on that setup. If you have a lot of use for it all, it makes sense to have right gear for it. Plus, if you have ever handled gear made by them, like just an aluminum quick release plate, you know what I am talking about. There is a certain feel to them.
Goofs
Many, if not all of the problems that you run into with panoramas can be solved. The best way to tackle them is to be consistent. It takes a lot of patience, but the results speak for themselves. Here is an example of what I was able to do on a monopod not long ago:

Overall, the results are excellent. The quality is simply much better than what is needed for research purposes. It is worth emphasizing how little effort this took. Based on the file information, the photography took me only five minutes. I then had the software, in this case Microsoft ICE, to compose this photo from 56 horizontal photos, covering the entire field of view twice, and it took only about two minutes for the software do that. To be clear, you do not need that many photos to cover 360 degrees, not even if you are taking vertical photos. This took me some ten minutes in total, if we allot a couple of minutes to post-processing, namely to fine tuning the exposure. Had I been more sensical about this and taken fewer photos, I might have been able to do this in about five minutes.
The only easy to detect problem that I notice with this composite photo is that a couple of people have been multiplied in the stitching process. Can this be avoided? Yes. It is possible to avoid it. The easiest solution is to avoid crowded places. That is not, however, a great solution if you are interested in panoramas of crowded places, such as city centers. A better solution is to pick a time of the day is not particularly busy (my preference; I like to avoid people, because the research subject is the landscape, not the people, who, in fact, end up obstructing the landscape). Then again, if you interested in panoramas of busy areas, then that is not a great solution either (empty area that is known to be busy just seems odd).
One solution to this is manual stitch. The problem with it is that it is time consuming. While I am fond of manual processing of photos, one by one, I would also like to point out that the longer you have been a photographer, the more you start to appreciate an optimized workflow. This means that you do not want to spend hours and hours on something, which no one but you and, perhaps, one of your colleagues is ever going to notice.
I would say that I am known among my colleagues as the person who cannot stand it if things are not upright in photos, nor things that protrude into photos from the sides. To me, it is simply poor composition. I sometimes have to live with it, if the photo happens to be the only one from that situation, but, to be clear, it really, really annoys me that I did such a poor job. It is, however, only me who takes issue with such as most people who end up seeing such poorly composed photos simply do not care about such. Even my colleagues do not really care, because they know that it happens and that there is not a whole lot one can do about it. You can rotate and crop in order to keep things appearing partially in the frame, but that is only a partial solution that often results in other things ending up appearing only partially in the frame.
If you ask me, it is not time well spent if you work on a photo for hours on something that most people do not notice, nor care about. You also have to take into consideration that no one might ever see that photo. It might exist, uploaded somewhere, but it might never be seen by a human. As everyone has a camera these days, photos are dime a dozen.
This is only made worse by how niche panoramas are in photography. While there is no shortage of software dedicated to panoramas, it is not part of the mainstream. The software is either very simplistic, which means there is little control over the process, or unnecessarily complicated for the uninitiated. If you ask me, you do not want to dedicate your time to manually composing panoramas. It is simply not worth it.
I believe that you also need to take into consideration the purpose of the photo. If you are interested in panoramas, you are most likely interested in the landscape and not the people in the landscape. So, if your panorama has a goof which results in the duplication of a person or an animal, for example a seagull, it does not even matter because its purpose is to depict the landscape, not people. It can look silly, but that is about it.
Another solution to this is to use a neutral density filter during the daytime. It will make it possible to have longer exposure times (slow shutter speeds), which will, in turn, blur people, making them largely indistinguishable from one another. I would say this is more of an aesthetic choice though. Some prefer to stop the motion because that blur can come across as eerie. Others prefer the blur, because it makes the otherwise static world seem more alive. It might, however, be your preference as it emphasises the landscape (the research subject), while avoiding looking odd (that, somehow, there is no one in a busy area).
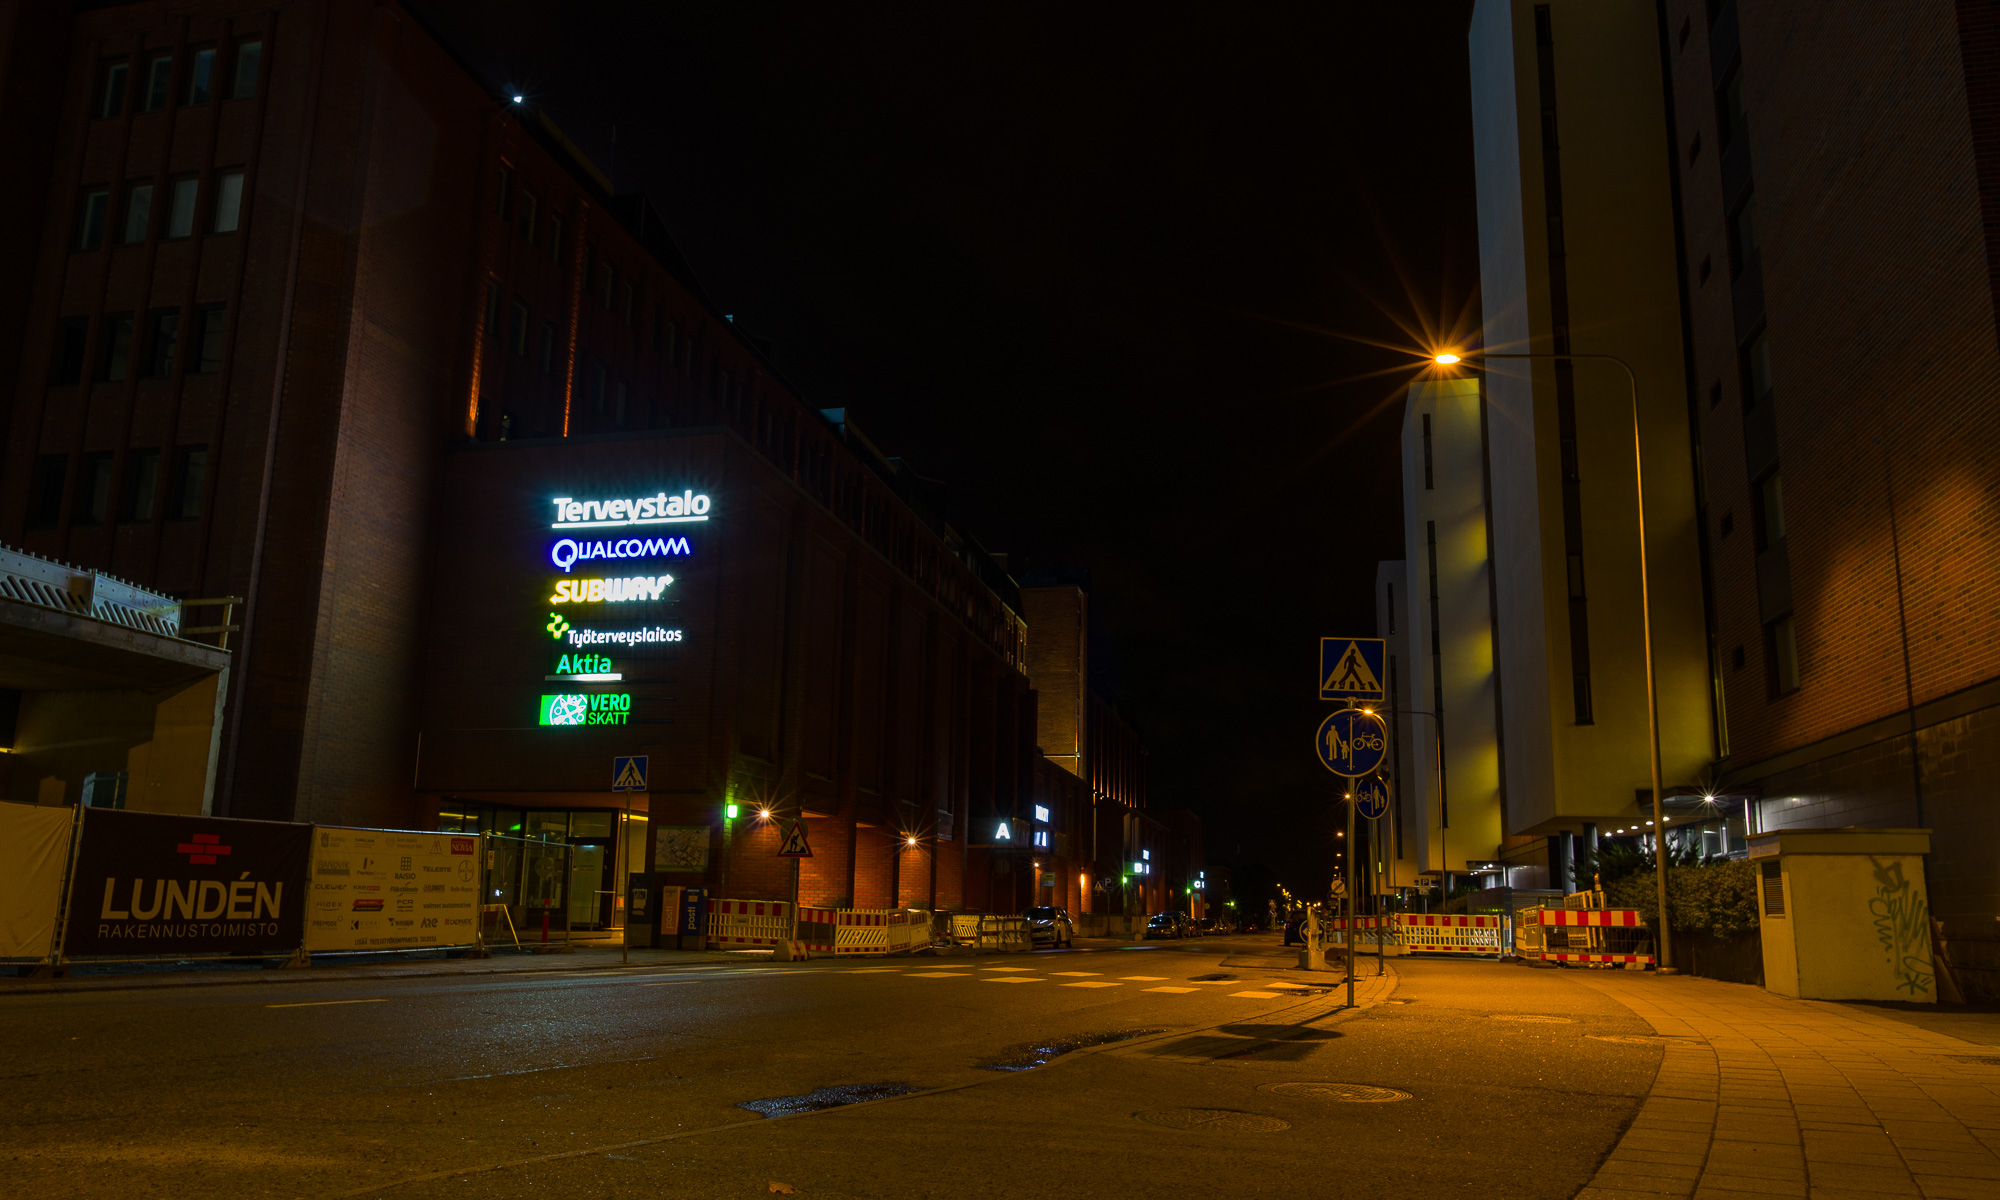
If you are interested in nighttime panoramas, this will unlikely be a concern for you. Here is the same view in the dark, processed with the same software:

Again, the results are stunning and the effort that went into this is a matter of minutes, not hours. You do have to have the camera on a tripod, but otherwise the process is the same. This time I was a bit more sensical about it and limited myself to only 25 photos. Once again, the photography took me only five minutes. Setting up the tripod and leveling it took me about ten minutes. Working with a tripod, I do not believe I could have done that faster. Then there was the fine tuning in post-processing, which takes a bit more time with nighttime photos, and running the same panorama software that did what it did in half a minute. In total, this took me about twenty minutes.
It is also worth noting that as the exposure time is much longer than it is during the daytime, people will either simply not be registered in the photos or appear blurry, ghost like, due to the long exposure time. This is a good thing if you wish to avoid having the people in panorama. It is, however, not a good thing if you wish to have them in the panorama, for example, to showcase a vivid nightlife. In this case this was not an issue as there was hardly anyone there due to the ongoing renovations at the time.
You may, however, still end up with some goofs even at nighttime, such as in this one:
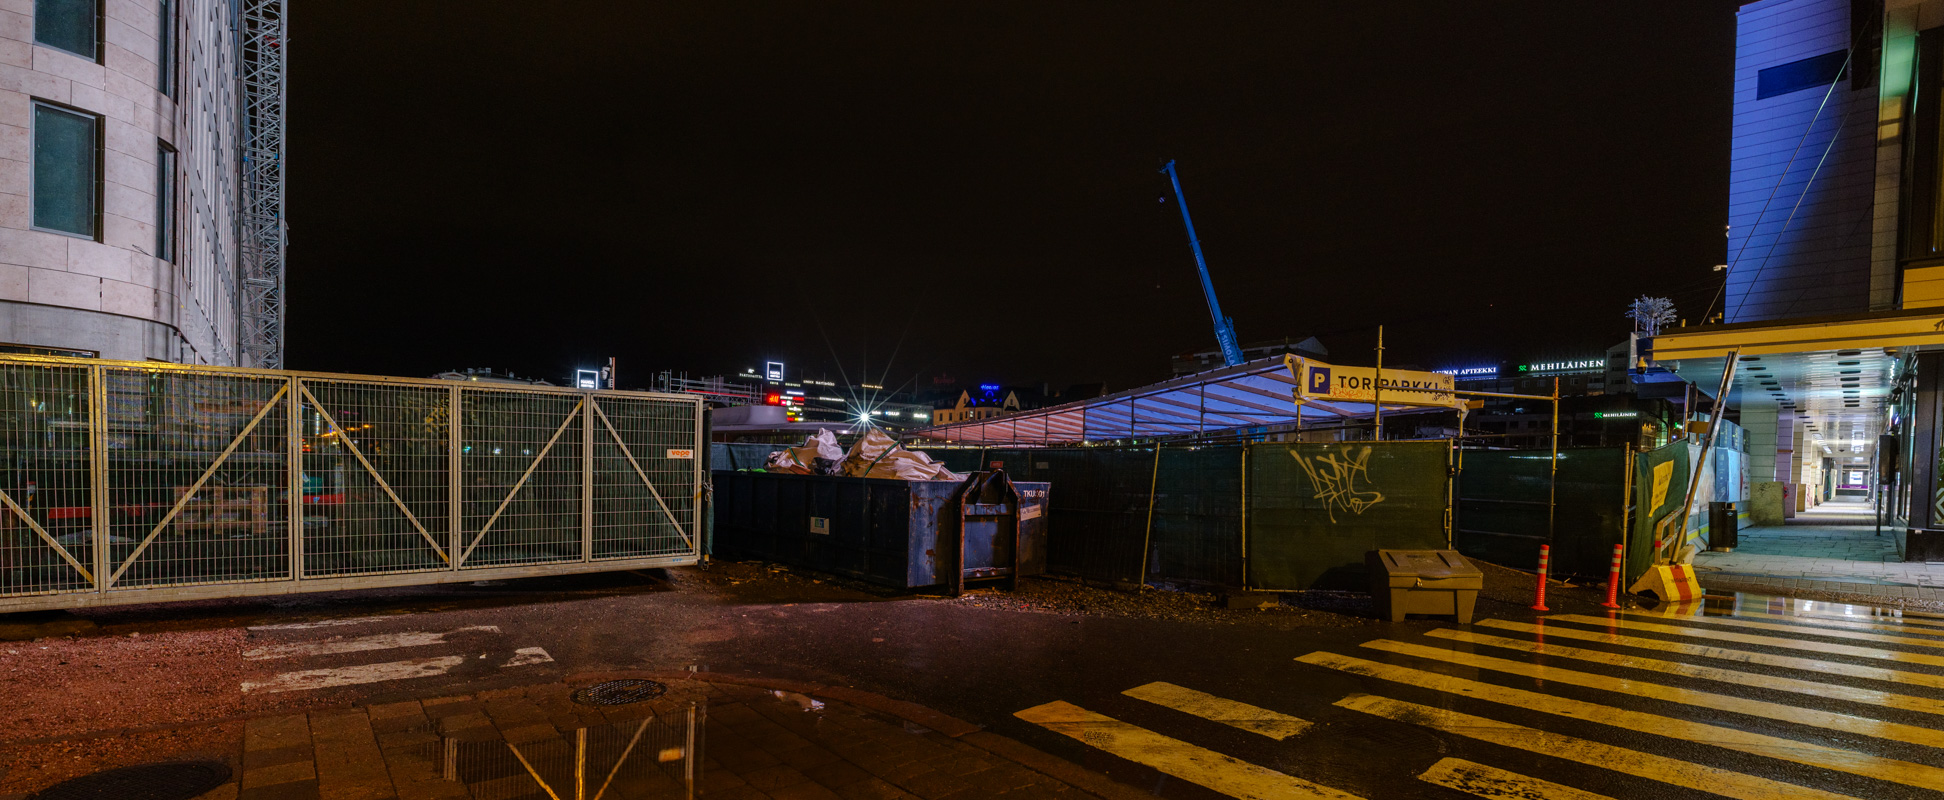
You may not notice the goof, as the culprit is not in the photo, but the cover on this walkway has two different color casts with a sharp boundary between them. To my understanding, this is caused by a massive video screen on the side of a building which projects different colors to surrounding materials that then appears on the photos. In most cases the photos are stitched to one another from their sides, taking into account the areas of overlap, and therefore it only makes sense that may end up with goofs like these.
I try to avoid goofs, but they crop up at times. I respond to such by having a laugh, while acknowledging that I am probably the only person who will ever notice it. It is, however, also a learning opportunity (and why I kept them, instead of redoing them). It is difficult to avoid such goofs if you have never encountered them, simply because you have never attempted to make it happen.
In my experience, the only way to avoid these kinds of goofs is to have enough photos to work with. For example, had I spent more time on the first panorama, certainly more than that five minutes, I believe I could have done much better and managed to eliminate such goofs, while still not spending hours on one panorama.
Stitching problems
You may not notice anything, but there is a stitching issue in the first panorama. That means that the pixels from one photo do not neatly align with the pixels from another photo. You probably will not notice that at a glance, but you can detect it (it says ‘Turuun’ instead of ‘Turun’ on a sign at a rooftop), and similar cases if you know what to look for. Rooftops are often the place to spot them. You may also find misaligned tiles on the ground.
One of dealing with such issues is not to care if it is difficult to even notice the error. I do, however, tend to care, so I would only use such landscape panoramas with clear stitching errors for educational purposes like this, to make you aware of them and to explain how you can avoid them.
How to avoid stitching issues? Well, in my experience, the better your setup is, the easier it is to avoid them. It may seem counterintuitive, but using a lot of photos with plenty of overlap may cause you more problems than only a handful of photos with less overlap. Why? Well, related to the goofs, because the stitching software needs to define where to merge the photos. If there is a lot of movement, people coming and going in each photo, the software will have hard time figuring out where to draw the line.
To avoid such issues, you would rather not have people coming and going. Then again, the problem with that view is that if there are no people in a panorama of a crowded place, it will not come across as a panorama of a crowded place.
Bottom line
Panoramas are useful as they help to illustrate a much wider view than what a wide-angle lens can provide. You do not need to flip through a number of photos as you can see it all at a glance. Plus, panoramas are, in fact, fairly easy to compose. You do, however, need to be patient in order to be consistent. In addition, I think you also need to be aware of the issues that you might face, such as the goofs that I mentioned in this post.
It can, of course, take a bit of getting used to. It is easy to small mistakes and then you have to do it all over again. Think of it as a process. I certainly did not think that I would run into various goofs before I started doing panoramas, but as I am now more aware of them, I am better equipped to handle them. I am also fairly fast because I have spent countless hours in the dark, fiddling with the camera settings, testing what works and what does not work. It allows me to dial in the settings at the spot, so that the photography may only take me some five minutes per panorama. If you are starting out, do not expect great results immediately, nor to be that quick.
For the best results, use a tripod. It will help you to avoid goofs and stitching errors (where things are not perfectly aligned). Of course, if you do not have the time, nor the space for it, then you will have do your best without one.
It is also worth noting that panoramas that are composed of multiple photos are not mutually exclusive to photos that are not composed in this way. Composing them for the sake of composing them is no better than photographing something for the sake of photographing it. If it serves a purpose, then it is a useful tool in your toolkit. Otherwise it is somewhat gimmicky.
You also have to consider how rare it is to see a platform that caters to a very wide format. Articles are a poor fit due to the traditional layout. It is the same with websites, including this blog. Most of the potential of panoramas remains untapped because of this. Therefore, I would say that in most cases traditional photos are much more useful to you and to others.