This post covers what you need to know if you are using a personal computer (PC) and want to record video game footage on Open Broadcaster Software (also known as OBS Studio or simply as OBS). This applies to all screen and audio capture, regardless of whether you seek to capture regular flat screen footage or virtual reality (VR) footage on a head-mounted display (HMD).
In practice, what you need is a PC that has all the necessary peripherals, namely a screen, a keyboard, a mouse, and a webcam, as well as headphones. Unlike with a video games console, such as the PlayStation 5 (PS5), you do not need rely on a lot of additional hardware, unless you plan to use another PC to capture all the footage.
Overall, one setup, either the console + PC or the PC only, is not better or worse than the other. What matters the most is that the PC only setup is simpler than the console + PC setup as all you need is one PC. However, using the same PC for playing the games and capturing the screen footage and additional footage is more demanding on the PC. This means that you will likely need a computer that handle both at the same time.
It is, of course, possible to record footage from one PC to another, just as it is possible to record footage from a console to a PC. However, the idea of this blog post is to cover the one PC only option. Moreover, current generation computers can handle playing a game and recording it at the same time fairly well.
Know your computer
To summarize a previous post, you do not need to know all the specifics about computers, but it is still highly important that you understand what your PC is capable of. That is why you need to understand what each component is, what it does, what it is capable of and, important for budgeting, what it costs.
To be clear, you do not need to know everything about the components. It is rather that you need to have an understanding of what components are needed to run games on certain graphic settings, on certain resolutions.
You also need to understand whether your PC can handle capturing footage while you are playing games on it or if another PC is need to handle that. In most cases a single computer will suffice, but if you happen to have a low-end PC and/or are really pushing your PC to its limits, you might need another PC for that. This is, however, another topic that deserves its own essay and therefore I will not expand on it here.
Hardware Setup
Once you have a PC, with an operating system (OS), OBS and video games to play, you should have everything you need. Everything should be in order, assuming that everything works.
As a word of warning though, playing video games is much more demanding on a PC than it is on a console. Even if things go smoothly, there is no guarantee that they will go smoothly tomorrow, the week after, the month after or the year after. Firstly, hardware can fail. Secondly, all of the software, including the OS, OBS and the video games are subject to change. They are often updated, which may cause issues with how they work in relation to one another. Something as simple as GPU driver updates may cause some game to not work, forcing you to troubleshoot what went wrong. You may even have to roll back drivers, which is not something you want to do, or simply wait for the GPU manufacturer to fix the drivers.
This is not to say that consoles never have any issues. They do. It is rather that have much fewer issues than PCs and they tend to get fixed rapidly, because the console manufacturer want you to keep playing. It wants you to keep buying more video games to play on the console.
This is even more the case with VR. For example, using Sony’s PlayStation VR2 (PSVR2) on a PS5 is an almost seamless experience. Using the same VR kit on a PC is much more complicated. You need additional hardware, namely an adapter, and software, Sony’s PlayStationVR2 application, and then configuring it all. That is a hassle and once you get it working, it is not exactly a seamless experience.
To further elaborate this example, my PSVR2 kit did not initially work with my PC. I thought the issue was my DisplayPort (DP) cable that connects the computer to the adapter. It was just a cable I happened to have connected to a screen. It was not DP 1.4, so I bought a DP 1.4 cable. That did not work. Then I bought a certified DP 1.4 cable. That did not work either.
The problem was not the cable. It was fine. Instead, the problem had to do with my AMD GPU drivers. They did not work with 90 Hz mode, which was set as the refresh rate in OpenVR (SteamVR Runtime). Once I changed it to 120 Hz mode, everything worked.
The gist of this was that I was under the impression that I needed to configure the HMD first using Sony’s PSVR2 application and only then configure the specifics in the OpenVR (SteamVR Runtime) settings. It made no sense that I had to change that setting in OpenVR (SteamVR Runtime) to properly configure the HMD in Sony’s PSVR2 application. Ultimately, it was trial and error that led me to figure out what the problem was.
To be fair, this was not Sony’s, nor Valve’s fault. It was AMD’s drivers that failed to work in the 90 Hz mode, which happened to be the default setting in OpenVR (SteamVR Runtime). To my understanding, this has now been fixed by AMD. This does, however, exemplify the kinds of issues you can run into in PC gaming. Something as simple as some driver issue with some setting in some software can lead to hours, if not days worth of troubleshooting. In my case, I figured it out the next day.
In general, the difficulty with PC troubleshooting is that it can be a hardware, a software issue, or a compatibility issue. If it is a hardware issue, you better have additional components to test each component, one by one. Unless you happen to own multiple desktop PCs, you better have friends who do. You may be able to get the component replaced under warranty, but you need to figure out which component needs replacing and the best way to do that is to have spare components. If it is a software or compatibility issue, you can report it and hopefully it gets fixed, sooner or later, while it is possible that it never gets fixed.
You may, of course, have technical support from your employer in a research project or funding for such through your funder. This alleviates many concerns related to PCs, but it does not eliminate them. Troubleshooting usually takes time and tests your nerves. Believe me, you would rather not waste time on figuring out what is wrong, with or without help, instead of just doing what you set out to do in the first place.
If it is a hardware issue and you can have others do the troubleshooting for you, repair your PC and/or replace the parts under warranty, it may take some time. It most likely cannot be fixed in a day or two, even with on-site warranty repairs. Instead, the faulty parts need to be inspected first and only then replaced under warranty. The vendor, the manufacturer or the importer representing the manufacturer may or may not have the parts in stock, which means that you may simply have to wait, some days, weeks, or even months.
It might also be that your support people do not know any better than you do. It may be that everything seems to be in order with the hardware, but something just does not work as it is supposed to. You just have to report the software issue and hope it gets fixed.
None of this is hardly ideal in a research project, because you are expected get results, not troubleshooting hardware, software or compatibility issues. Usually things go smoothly, but these things do happen and it might be that you cannot do anything about it and just have to wait.
Configuring OBS
The good thing about PCs is that capturing gameplay footage in OBS, i.e., what you see and hear while you play the game, is fairly simple on them. You do not need to configure an internal capture card or an external capture device, nor to check that the game audio is in sync with the game video.
What you need to do is to simply launch the video game and then add it as two different sources in OBS. You need to add it as a video source and as an audio source.
For video: select ‘Game Capture’ -> ‘Mode’ -> ‘Capture specific window’ -> select the game window. This will capture the video, i.e., what it is that you seen on your screen, in that game.
For audio: select -> ‘Application Audio Capture (BETA)’ -> ‘Window’ -> select the game window. This will capture the audio, i.e., what it is that you hear in your headphones, in that game.
There are some alternative ways of configuring that, but this is the simplest configuration. You may, of course, want to tinker with various settings, to check the video quality and audio levels, etc., but this is basically all you need to do. Usually even your recording resolution is correct by default.
Configuring OBS: The Canvas
Before recording anything, it makes sense to take a moment to think what it is that you are trying to accomplish. You need to know what you will be recording and how it will be arranged visually on the canvas in OBS.
- Overall aspect ratio: 16:9? 32:9?
- Overall recording resolution: 1920×1080? 3840×1080?
The aspect ratio defines the horizontal and vertical dimensions of your canvas. 16:9 is the most common aspect ratio. When you watch your recording on a screen, it fits the screen neatly. 32:9 is double wide horizontally. That equals to two 16:9 screens, side by side.
It is clear that 16:9 aspect ratio makes most sense, if you wish to use the recordings later on a typical 16:9 screen. However, you then have to include any other sources, such as video camera footage and heart rate footage, on top of it, for example in one of the corners.

The major benefit of this is that this way the footage is synchronized, whereas saving the screen capture and the room video feed as separate video files requires additional work to subsequently synchronize the footage.
There are some workarounds that allow synchronizing the footage, while saving it to separate files. However, if you want to watch the footage, you must run two separate files simultaneously, side by side. You could also combine the footage later on, but this simply takes additional time, which you probably would rather spend on research.
Opting for the commonly used 16:9 aspect ratio does, however, have its disadvantages. Parts of the main source is obscured by the other sources and these other sources are recorded in a much smaller resolution than the main source.
It is possible to overcome both issues in two ways. You can alter the overall aspect ratio and/or the overall recording resolution by altering the canvas.
The overall resolution defines how many pixels you have horizontally and vertically. Using the 16:9 aspect ratio, the common screen resolutions are:
- 1920×1080 pixels ≈ 2 million pixels in total
- 2560×1440 pixels ≈ 3.7 million pixels in total
- 3840×2160 pixels ≈ 8.3 million pixels in total
Choosing the resolution depends on three key factors. Firstly, it is worth acknowledging that 1920×1080 (FHD/1080p) is the most common screen resolution. 2560×1440 (QHD/WQHD/2K/1440p) and 3840×2160 (UHD/4K) are far less common. Secondly, higher resolution recordings will take more disk space. Thirdly, higher resolution recordings are more demanding on your PC hardware. Simply put, recording in higher resolution than 1920×1080 is likely going to have diminishing returns.
If you are willing to change the aspect ratio, you can alter the canvas. You can, for example, create a dual screen setup by doubling it horizontally (e.g. 1920×1080 -> 3840×1080). This allows watching both the screen capture and the room video feed in high resolution, alongside one another. The aspect ratio is then 32:9.

The major advantage of the dual screen setup is that it contains high resolution recordings of both the primary and secondary sources. Furthermore, this setup is also less demanding on your hardware than you would think.
- 1920×1080 pixels ≈ 2 million pixels in total
- 2560×1440 pixels ≈ 3.7 million pixels in total
- 3840×1080 pixels ≈ 4.2 million pixels in total
- 3840×2160 pixels ≈ 8.3 million pixels in total
It does not require a GPU that is capable of handling 4K recording. Instead, the requirements are closer to a GPU that can handle 2K recording. Therefore, it is unlikely that you would need a high-end PC for this purpose.
The major disadvantage of this setup is that it does require two 16:9 screens or one 32:9 super ultrawide screen to view the recordings as intended. While the video recordings will be compatible with all screens, regardless of their aspect ration, they lack the convenience of the 16:9 aspect ratio.
Recording in 3840×1080 resolution is far more demanding than recording in 1920×1080 or 3840×1080 resolution. While it might be possible to pull this off on a current generation low-end PC, it might not be enough.
If you ask my opinion, I think the 16:9 aspect ratio setup makes more sense than the 32:9 aspect ratio setup, for the simple reason that it can be easily displayed on a typical computer screen. However, I think the alternative can be particularly useful in research projects that need high resolution recordings of the player’s face and/or body or multiple players’ faces and/or bodies, as well as the movements and interactions with one another.
Configuring OBS: OpenVR
While playing a video game on a PC and capturing the screen footage is very simple in OBS on the same PC, it is far from simple if it involves VR. There are many hardware and software solutions, which complicates things considerably.
I will be explaining how OBS is used to capture footage from OpenVR (SteamVR Runtime). I am exemplifying this with Sony’s PSVR2. If you are using different platform and a different VR HMD, you may need to do things differently.
To my knowledge, there are two ways of capturing VR video footage using SteamVR. You can use the SteamVR application itself or an OBS plugin.
SteamVR allows you to view what you see in VR in a separate window. Click on the hamburger button (top left corner) by STEAMVR [version …] and select ‘Display VR View’. New window should pop up. Click on the hamburger button (top left corner) by the ‘Menu’ and select which eye you want to view or if you want to view both eyes.
You can then capture this window in OBS. Select ‘Game Capture’ -> ‘Mode’ -> ‘Capture specific window’ -> select the VR View window. It is that simple. However, what you see in VR is rendered in low resolution.
You can also an OBS plugin. There are two versions of it:
the original and a further developed version:
- Original: OBS-OpenVR-Input-Plugin
- Further developed: OpenVR-Capture
I am mentioning both as the further developed version made my OBS crash, when I had both eyes as sources. Try the newer one first and see if it works. If you into the same problem, then try the older, original one instead.
In OBS, you need either one or two sources, depending on whether you want include the view from one eyes or both of your eyes. Add one source first: ‘OpenVR Capture’. Select either the left eye or the right eye by ticking or unticking the ‘RightEye’ box. Then add another OpenVR Capture source the same way, if you want to cover both eyes. Select the eye that you did not choose previously.
What you need to understand is that what you see in SteamVR view on your screen is not exactly what you see in VR. This also applies to Sony’s PSVR2, which provides a similar view on your flat screen.
OBS windows are rectangular, but the VR content displayed in these windows are circular. To be clear, the illustrations that I am using to explain this are not accurate depictions. I am simply using them to give you an idea of how this works.

If you want to display what one of your sees in VR, it makes little sense to include all of the area in the square on the canvas. The areas outside the circle will simply be rendered as black.
Only what is contained in the circle is what can be seen in VR. However, computer screens are not circular. They are rectangular and typically come in 16:9 aspect ratio.

It is possible to use only part of the circle. The rest must then be cropped out, to avoid having certain parts of the canvas from being rendered as black.

To use both of your eyes, it is a matter of aligning the two windows, one for each source, one for each eye, on the canvas.

The problem with this is that, once again, you can only use parts of each source. Otherwise you will get certain parts of the canvas rendered as black.

This means that the area that you want to include on the canvas must be contained within the two circles. The rest must be cropped out.

In summary, much of what can be seen in VR must be cropped out from the recording. Otherwise certain areas of the canvas are rendered as black. This is not ideal, but it is what it is.
The problem with using both eyes as sources in OBS is that you will notice a seam, no matter how well you align the two sources.
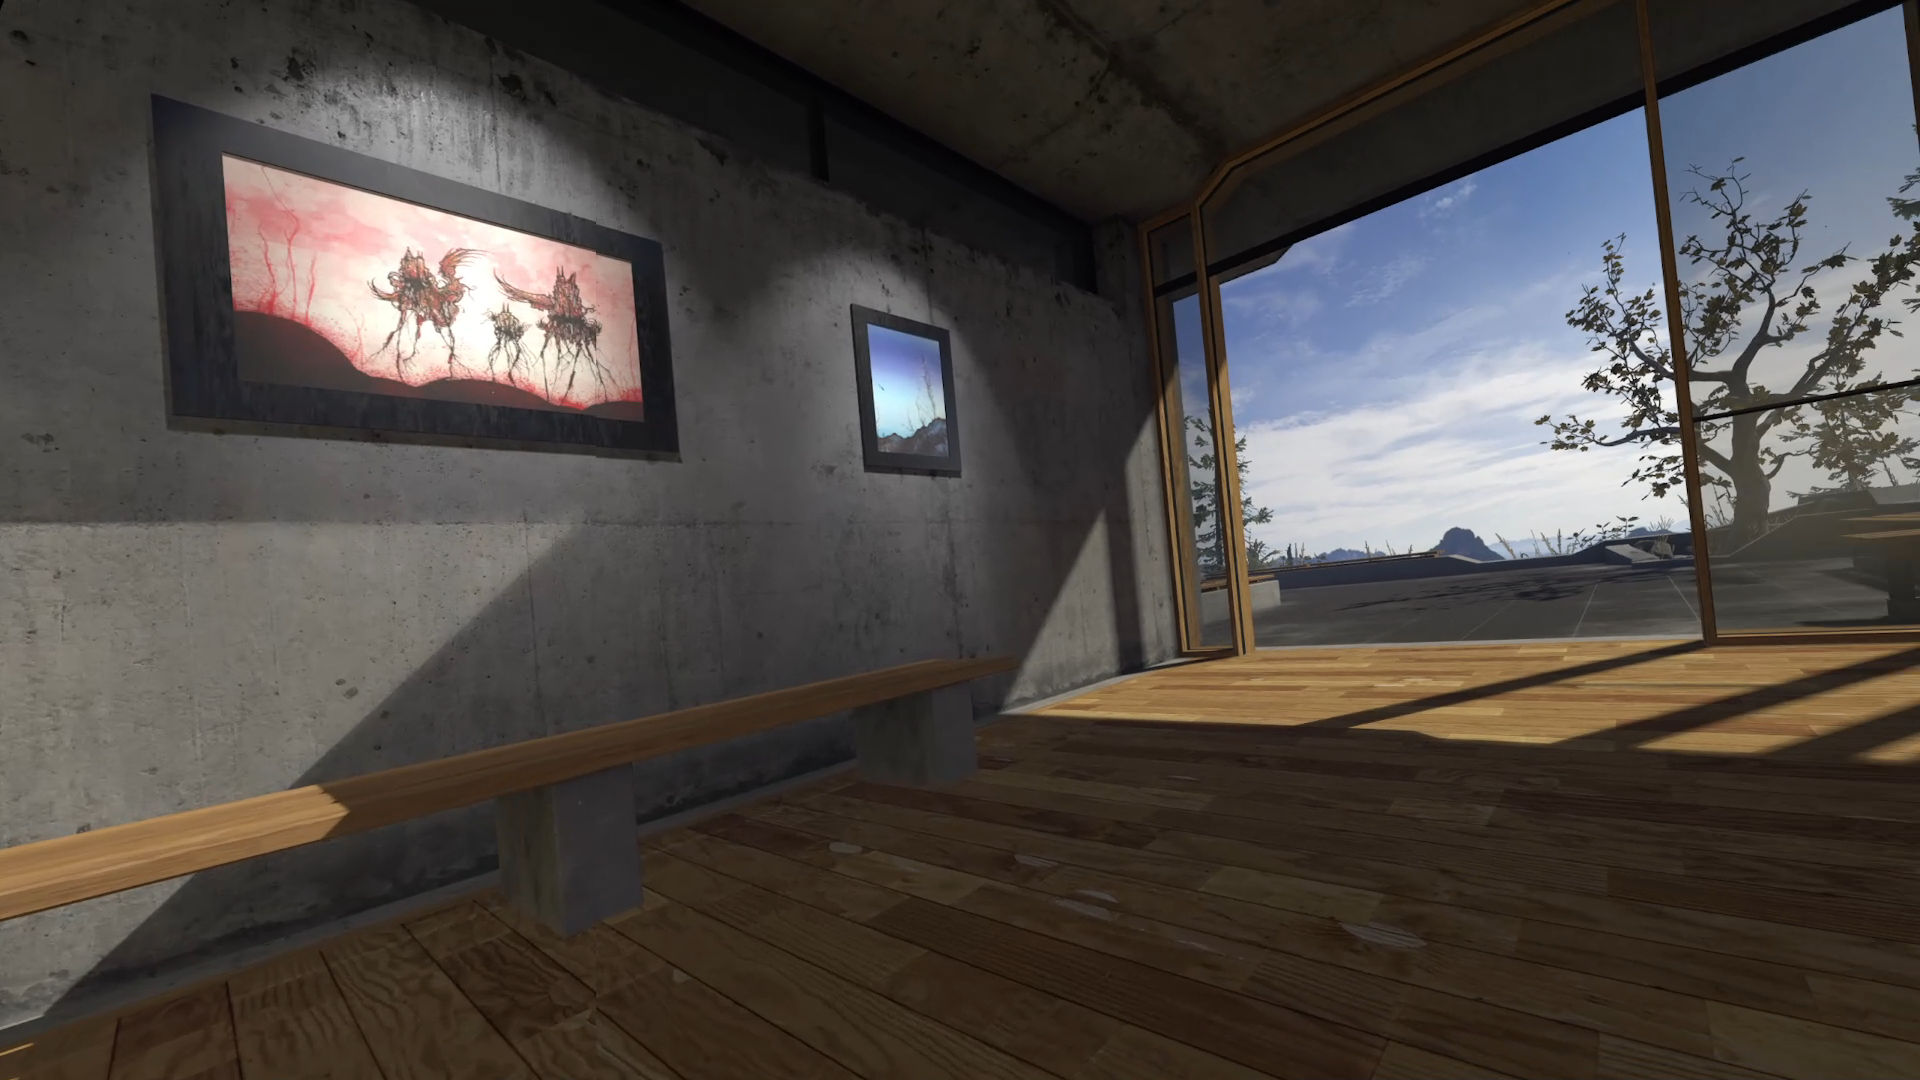
In my example, the large painting in the SteamVR Runtime home area appears to have a seam. The frame does not align properly. You will notice this seam in the video footage quite easily. You might not notice it against an even surface, but it is quite noticeable against anything patterned, such as tiles.
This can, however, be remedied. Adrien Lelièvre explains this particularly well on his website and also provides a video tutorial of it. It took me a while to get this to work. The problem was that I was not following the instructions.
In summary, the idea is to get the two sources align first. In this case the left eye source is at the bottom, while the right eye source is at the top, which is why the seam is on the left of the canvas. The trick is to select the source on top, in this case the one for the right eye, and add a filter to it. Choose ‘Image Mask/Blend’.
Make a screenshot of the right eye view (the square with the circle) and open that screenshot in some image manipulation program (e.g. GIMP) and create a layer on top of the existing layer. Exit the filter menu in OBS. Look at where the seam is on the canvas for reference.
In the image manipulation program, select the empty layer. Then use use a black/white gradient fill on that empty layer, dragging it over where the seam should be on the screenshot (it is not there to be seen in the screenshot, because it is just from one eye). On the left side of the layer you should have black and on the right side you should have white. Save that simple looking layer as a png file.
Return to the filter menu in OBS for that right eye source. It should already have ‘Alpha Mask (Color Channel)’ as the ‘Type’. Below it, click ‘Browse’ and locate the png file you saved. Do not change the color from white. That is your Alpha Mask. The click ‘Close’. That should be it.
What happens is that the white area will be displayed, but any other color, in this case black will not be shown. The gradient should blend images from the two sources.
This is, of course, easier said than done. This is why I recommend you follow Lelièvre’s tutorial (see references).
I also recommended recording video clips. This allows you to better assess whether you succeeded or not. You may have to go back and adjust the two sources on the canvas and/or the Alpha Mask png file. It was a trial and error for me, but I think the results look fairly good.
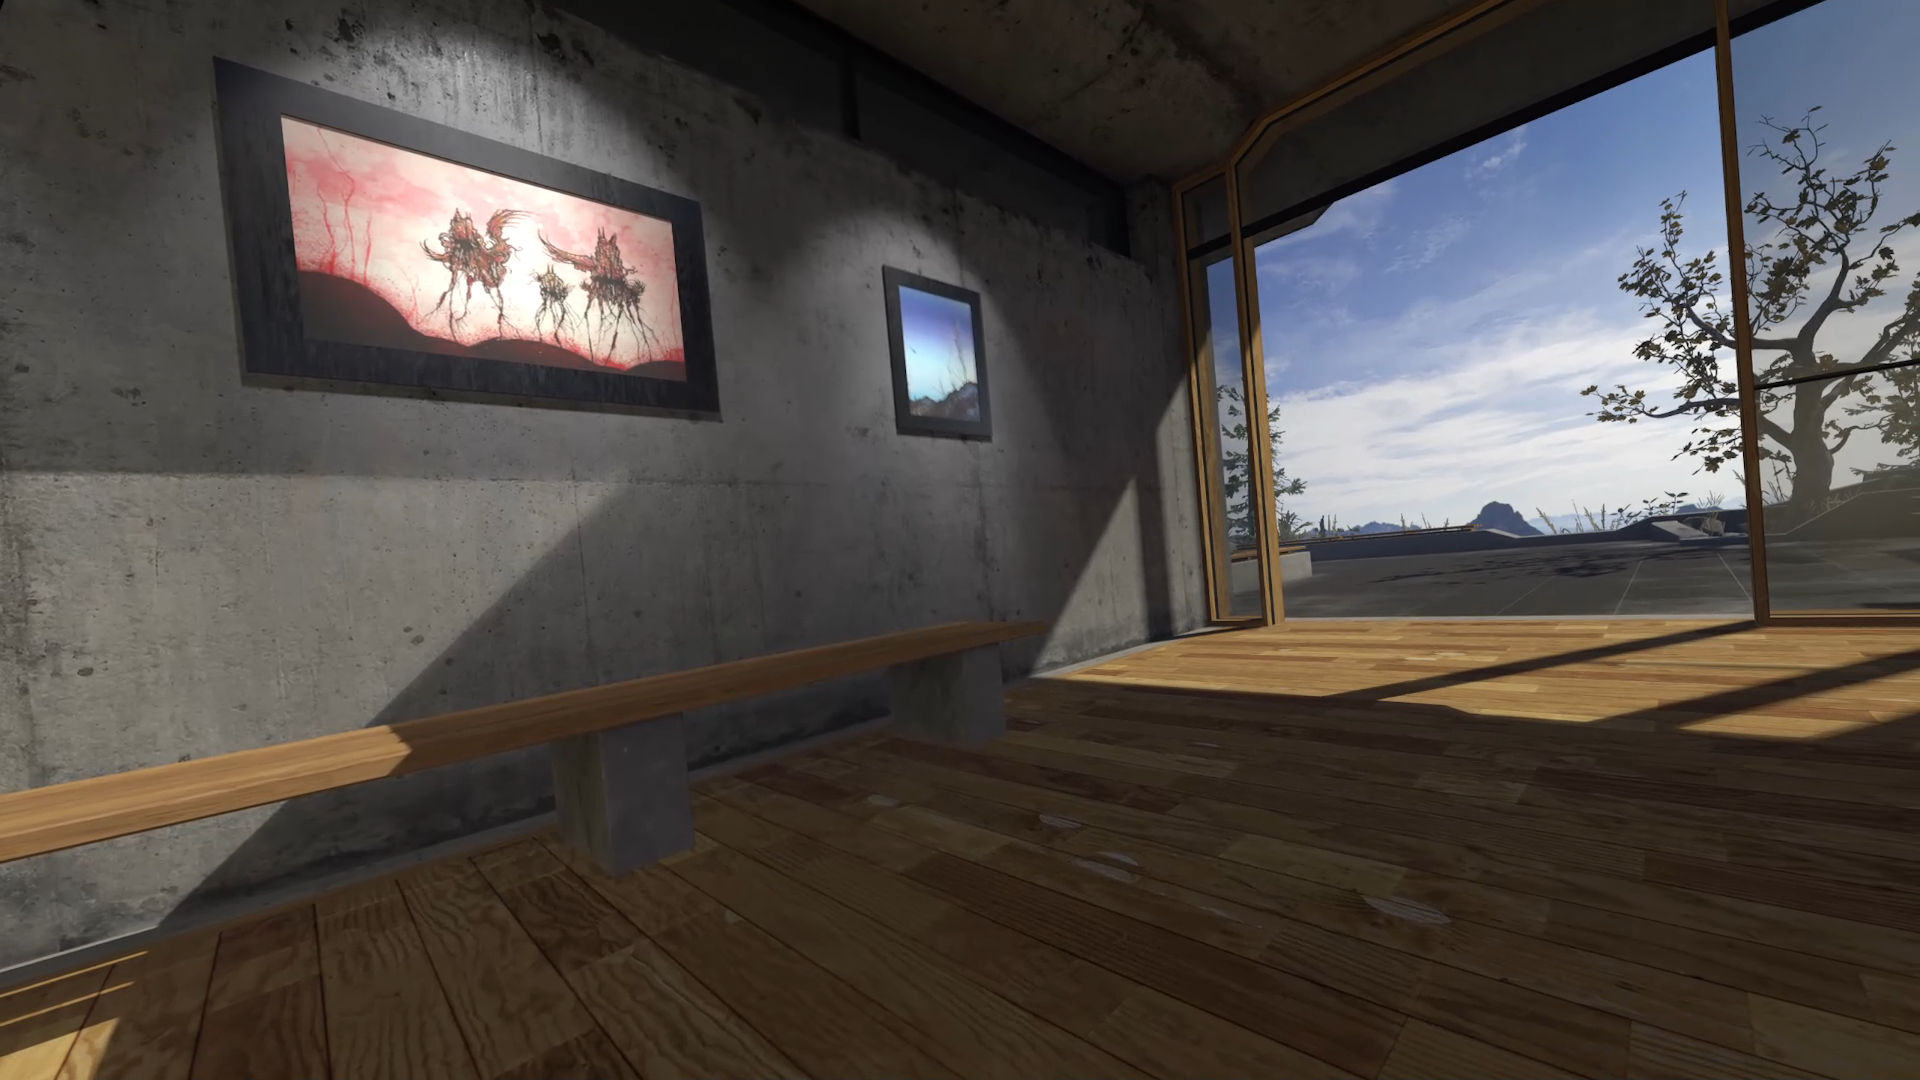
I cannot see the seam anymore in the second example depicting the SteamVR Runtime home area. The seam no longer distracts me when I view the video files.
I am not providing you with an alpha mask file here, nor does Lelièvre do that, because the way this works depends on your HMD and the alignment of the OpenVR Capture sources on the OBS canvas.
To be clear, this is not a perfect solution to this problem. It would be much better if the HMD manufacturers and/or software developers, such as Valve for the OpenVR / SteamVR, would make this possible for the users.
Additional Hardware Setup: Video camera
I would first consider what you are setting out to do. What is it that you are recording?
- View: your entire body, upper body or face?
You will need to decide whether your video camera footage will cover your whole body, the upper body or your face. This matters, because it ties in with a number of technical considerations.
- Video feed resolution: 4K, 1440p (2K), 1080p or 720p?
- Video feed frame rate: Over 60 FPS, 60 FPS, 30 FPS?
- Zoom: digital or optical?
You must also decide how the video camera footage is presented on the OBS canvas.
- Whole body: 32:9
- Upper body: 16:9 or 32:9
- Face: 16:9 or 32:9
If you opt to cover your whole body, it would make sense to opt for the 32:9 aspect ratio, having the game footage on one side and the video camera footage on the other side. Otherwise it might be difficult to see what you were doing in relation to the game when you watch the footage.
I do not think that there are many cases where you want to opt to cover the whole body as it is uncommon to move physically while playing a game in front of a computer screen or a large television screen. The notable exceptions would be exercise games and VR games.
If you opt to cover only your upper body or your face, it would make sense to opt for the 16:9 aspect ratio, having the the video camera footage presented over the game footage, for example in one of the corners of the canvas.
You could, of course, also opt for the 32:9 aspect ratio if you only cover your upper body or your face. You might have some reason for that and therefore it is worth considering.
If you are afraid that the 16:9 option lacks clarity, that you cannot see your upper body and/or face clearly, in the video recording, you can always increase the canvas resolution, for example to 1440p (2K). This does, however, make the recording more computationally demanding for your PC.
The good thing about the 16:9 option is that you are recording yourself in lower resolution than what your video camera video camera is capable of. This allows you to utilize the digital zoom to your advantage. You can place the camera below your screen, so the camera sensor faces you instead of looking up, and then simply crop the view the way you want, as if the camera had been placed higher.
To be clear, you can use the same trick with the 32:9 option if you happen to have a 4K capable camera and your PC can handle the extra computational load that comes with it. Moreover, if you intend to match the FPS of the game footage and the video camera footage, it is worth noting that most budget friendly video cameras can only handle 30 FPS in 4K, no matter what the resolution will be on the canvas.
Webcams usually have fixed focal length lenses, which means that you can only use digital zoom, i.e., crop the footage. The other types of video cameras can take advantage of optical zoom. This simply means that you can zoom in without it actually being a crop of the set resolution. Therefore, it is likely that you benefit more from a 4K webcam than you do from a 4K dedicated video camera.
With VR games, it is unlikely that you need, nor benefit from a 4K and 60 FPS capable video camera with the 32:9 option. While you do need to be aware of the video camera placement, to avoid bumping into it while in VR, there is no screen that it could obscure. You therefore can place the video camera wherever you like, removing the need to crop the video camera footage.
Configuring OBS: More Sources
USB-webcams can be simply plugged into your computer. Digital cameras and video cameras, such as camcorders, require an HDMI or a mini-HDMI cable, an HDMI-USB adapter. You need them to connect the camera to your computer and to them a source in OBS. Alternatively, it is possible to use a capture device or a capture card instead of an HDMI-USB adapter. This makes sense if you need higher resolution and/or higher frame rate footage from the video camera, but these options tend to be more expensive.
A dedicated video camera typically also has a microphone port. This allows you to use a separate wired microphone that plugs into the video camera with a 3.5mm audio cable or a wireless microphone, which has a receiver that plugs into the same place with a short 3.5mm audio cable. Then you add it as an audio source in OBS.
Alternatively, you can plug the wired microphone or the wireless microphone receiver directly to your computer, to the microphone (mic) port or to a USB-port, depending on the connectivity, and add it as an audio source in OBS.
Once everything is plugged in, it is important to see that the additional sources are visible and audible in OBS. If you are using a webcam or a dedicated video camera, but not a separate wired microphone or a wireless microphone receiver that is plugged directly to your computer, check that you can see and hear the footage.
If you are using a microphone or a receiver that is plugged directly to your computer, compare the audio with the audio from the webcam or the dedicated video camera. Make sure that the audio and the video is in sync.
References
- Kegetys ([2017] 2018). OpenVR Input Plugin 1.1 (computer software). https://obsproject.com/forum/resources/openvr-input-plugin.534/
- Lelièvre, A. (2020). Setting OBS for VR: prefered eye and wider field of view. https://albatrossdead.wordpress.com/2020/08/14/setting-obs-for-vr-prefered-eye-and-wider-field-of-view/
- Pigney ([2024] 2025). OpenVR-Capture v1.8.4 (computer software). https://obsproject.com/forum/resources/openvr-capture.2038/
- OBS Project ([2012] 2025). OBS Studio (computer software). https://obsproject.com
- Valve Corporation ([2015] 2025). SteamVR Runtime (computer software). https://store.steampowered.com/app/250820/SteamVR/